
๐ฃ Kettlebell Clean Workshop
A powerful clean should land smoothly, not crash into your forearm. Learn how to turn explosive hip drive into an efficient kettlebell rack, mastering bell trajectory, hand insertion and timing through practical drills, technical corrections and progressive training.
๐ Introduction
Explosive hip drive. Smooth hand insertion. Complete control of the rack.
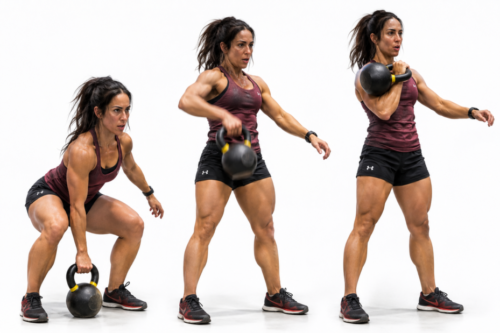
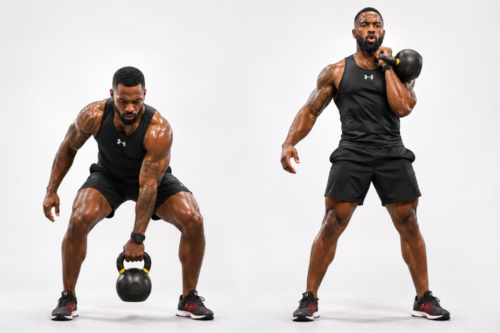
The kettlebell clean is a foundational ballistic exercise that combines explosive hip extension with precise coordination, bringing the kettlebell from a backswing into a secure rack position against the forearm and upper body.
Building upon the mechanics of the kettlebell swing, the clean introduces new technical challenges: redirecting the bell along a compact upward path, managing the grip transition and receiving the weight without excessive forearm impact.
An effective clean demands precise timing between the hip drive, elbow guidance, hand insertion and rack fixation. Mastering these elements develops power, coordination and conditioning while establishing the foundation for exercises such as the clean and press, front squat and clean and jerk.
This workshop focuses on the single-arm Hardstyle kettlebell clean, breaking the movement into manageable stages before progressing towards technically consistent, continuous repetitions.
๐ฏ Purpose & Foundations
What Does the Kettlebell Clean Develop?
The clean is a ballistic, hip-driven exercise that redirects force generated through the hips and legs into a compact upward movement, finishing in the rack.
Unlike the conventional swing, which projects the kettlebell forwards in an arc, the clean requires additional elbow guidance, grip management and precise timing.
| Training Quality | Primary Benefit |
|---|---|
| Explosive Power | Develops rapid hip extension and coordinated force production |
| Posterior-Chain Strength | Challenges the glutes, hamstrings and supporting musculature |
| Rack Stability | Develops control of an asymmetrical load against the upper body |
| Core Stability | Challenges trunk bracing and resistance to unwanted rotation or lateral movement |
| Grip Control | Develops control through changing handle positions |
| Conditioning | Challenges muscular endurance and cardiovascular fitness |
| Coordination | Develops timing between hip drive, hand insertion and rack fixation |
๐ช Primary Muscles Involved
The gluteus maximus and hamstrings generate much of the explosive hip-extension force, assisted by the quadriceps during knee extension. The spinal erectors, abdominals and obliques stabilise the trunk and resist unwanted movement under the asymmetrical load.
The latissimus dorsi and upper-back muscles help control the working arm and guide the kettlebell’s trajectory. The shoulders and upper-arm muscles assist with positioning and stabilising the load, while the forearm and hand muscles manage the grip transitions.
Although the clean recruits muscles throughout the body, the hips and legs provide the principal acceleration, while the upper body guides, receives and stabilises the kettlebell.
๐๏ธ Why the Rack Position Matters
The rack position is the defining finish of the kettlebell clean. The weight rests securely against the forearm and upper body, allowing the athlete to stabilise the load while maintaining balance, wrist control and trunk tension.
A reliable rack also provides the starting position for several important exercises:
- Clean and Press: Transitioning into an overhead press.
- Front Squat: Supporting the kettlebell during a loaded squat.
- Clean and Jerk: Preparing for an explosive overhead lift.
- Front-Rack Carry: Maintaining stability while carrying an asymmetrical load.
- Double-Kettlebell Exercises: Supporting two kettlebells for squats, presses and other movements.
Rack positioning varies according to anatomy, kettlebell dimensions and lifting style. The objective remains the same: support the load securely without excessive wrist strain, unnecessary muscular effort or loss of balance.
๐ ๏ธ Before You Begin
The clean is best approached after establishing competence in fundamental kettlebell movements.
Before attempting full ballistic cleans, you should be comfortable with:
- The Hip Hinge and Swing: Generating force through hip extension while maintaining controlled spinal positioning.
- The One-Handed Swing: Managing an asymmetrical load, maintaining balance and controlling the returning backswing.
- Basic Grip and Load Control: Handling a manageable kettlebell securely during lifting and lowering movements.
You do not need to have mastered the rack position or hand insertion before beginning this workshop. Both skills are developed through the preparatory drills in Section 4.
However, establish reliable hip-hinge and single-arm swing mechanics before progressing to complete ballistic cleans.
The objective: Build upon existing hip power and unilateral control, developing the precision required to guide the kettlebell into the rack and return it safely for the next repetition.
โก Quick-Reference: The Hardstyle Kettlebell Clean
Seven essential coaching cues:
| Coaching Cue | Execution |
|---|---|
| 1. HINGE & HIKE | Push the hips backwards and hike the kettlebell between the thighs, maintaining a stable trunk. |
| 2. DRIVE | Extend the hips explosively, generating the power to accelerate the kettlebell upwards. |
| 3. GUIDE | Bend the elbow towards the ribs, directing the bell along a compact upward path without excessive arm pulling. |
| 4. INSERT | Ease unnecessary grip tension and guide the hand through the handle, allowing the bell to roll smoothly into position. |
| 5. RACK | Stand tall with the kettlebell supported against the forearm and upper body, wrist aligned and elbow comfortably close. |
| 6. DROP | Guide the kettlebell out of the rack along a controlled downward path, allowing the handle to reposition securely. |
| 7. RELOAD | Hinge as the returning arm approaches the torso, receiving the load through the hips before the next repetition. |
โ๏ธ Biomechanics & Technique
The single-arm Hardstyle kettlebell clean combines explosive hip extension with a compact upward trajectory, smooth hand insertion and a stable rack position.
Each phase must connect efficiently to prevent excessive arm pulling, forearm impact or an unstable catch. The following breakdown begins with a floor-started repetition before progressing to continuous cleans.
Phase 1. The Setup and Hike Pass
Place the kettlebell slightly ahead of your feet. Stand approximately shoulder-width apart, adjusting your stance to allow sufficient clearance for the backswing.
Hinge backwards at the hips, bending the knees naturally while maintaining a neutral spinal position. Keep your head and neck aligned with your torso.
Establish a secure single-hand grip without excessive tension. The handle should sit comfortably through the fingers and palm, allowing the grip to adjust during the clean.
The working arm may rotate naturally, with the thumb pointing backwards or somewhat downwards during the backswing, depending on anatomy and grip preference.
Engage your trunk and upper back, keeping the shoulder controlled and pressure balanced across both feet.
Tilt the kettlebell towards you and hike it sharply backwards between your thighs, keeping the working arm close to the torso while allowing it to lengthen naturally. The opposite arm may assist balance without creating excessive trunk rotation.
Maintain the loaded hinge throughout the hike. Avoid standing prematurely, pulling with the biceps or allowing the kettlebell to swing excessively low.
Allow the bell to reach the loaded backswing before initiating the upward drive, establishing the momentum and positioning required for explosive hip extension.
Coaching cue: Hips back. Hike deep. Load the hips.
Phase 2. The Explosive Hip Drive
As the kettlebell reaches the loaded backswing, drive firmly through your feet and explosively extend your hips and knees.
The glutes and hamstrings generate much of the hip-extension force, assisted by the quadriceps during knee extension. The trunk remains braced, transferring force while resisting unwanted spinal movement and rotation.
Keep the working arm connected towards the torso during initial acceleration. Avoid prematurely bending the elbow or attempting to curl the kettlebell upwards.
The hips initiate the movement, generating momentum that the arm subsequently redirects towards the rack.
Finish the drive standing tall, with the hips and knees extended, glutes engaged and abdominals braced. Avoid leaning backwards, exaggerating lumbar extension or rising onto your toes.
The objective is to generate sufficient acceleration for the kettlebell to reach the rack without relying on excessive upper-body effort.
As the kettlebell rises, the elbow begins guiding its trajectory, transitioning into the next phase.
Coaching cue: Drive through the floor. Explode through the hips.
Phase 3. Upward Trajectory and Elbow Guidance
As the kettlebell accelerates out of the backswing, the working arm redirects its momentum towards the rack.
Unlike the conventional swing, the clean requires a compact upward trajectory, guided by coordinated elbow movement rather than excessive arm pulling.
Timing the Elbow Movement
As the hips extend, allow the working elbow to bend and travel backwards towards the ribs, shortening the bell’s forward arc and directing its momentum upwards.
In Hardstyle coaching, this is sometimes described as striking the elbow backwards. However, the action should remain coordinated with the hip drive rather than becoming an aggressive, isolated pull.
Avoid prematurely bending the elbow, curling the kettlebell or shrugging the shoulder to generate additional lift.
Keeping the Kettlebell Close
Guide the kettlebell upwards along a compact path, sufficiently close to the body without pulling it against the chest.
The trajectory need not be perfectly vertical. Some natural curvature is expected according to anatomy, kettlebell dimensions and lifting technique.
An excessively wide arc requires greater correction towards the rack, increasing the risk of an uncontrolled catch or forearm impact.
Conversely, pulling too aggressively towards the torso can disrupt momentum and interfere with hand insertion.
Transitioning Towards the Rack
As the kettlebell rises, allow the elbow to settle comfortably beside the torso without rigidly pinning it against the ribs.
The precise elbow path and degree of flexion may vary, provided the shoulder remains controlled and the movement stays primarily hip-driven.
As upward momentum diminishes, begin repositioning the hand within the handle, preparing the kettlebell to settle securely against the forearm.
Coaching cue: Hips launch. Elbow guides. Keep the bell close.
Phase 4. Hand Insertion and the Overhead Catch
Hand insertion allows the kettlebell to transition smoothly into the rack by repositioning the hand within the handle while controlling the bell’s rotation, preventing forceful forearm impact.
Timing the Hand Insertion
As the kettlebell approaches the rack and its upward momentum diminishes, begin inserting the hand while the bell is still rising, rather than waiting until its highest point.
Reduce unnecessary grip tension and guide your fingers forwards through the handle opening. In Hardstyle coaching, this is commonly described as spearing the hand through the handle.
Coordinate the movement with the elbow travelling towards the torso. Avoid aggressively punching upwards or releasing control of the handle.
Establishing the Rack Grip
Allow the handle to settle diagonally across the palm, extending towards the heel of the hand, creating a secure supporting position with the wrist approximately aligned with the forearm.
Handle angle and insertion depth vary according to hand size, kettlebell geometry and technique. Avoid excessive wrist extension or gripping so tightly that the handle cannot reposition smoothly.
Controlling the Bell's Rotation
As the hand enters the handle, the kettlebell rotates around it and settles against the forearm.
Guide the hand into position before the bell completes its rotation, rather than allowing it to flip over a rigid fist. Contact should be controlled, without forceful impact.
A wide upward trajectory, late insertion, excessive acceleration or an overly tight grip can cause the bell to strike the forearm. These faults are examined individually in Section 3.
Once the handle settles securely, establish the stable rack position described in Phase 5.
Coaching cue: Spear the fingers. Guide the rotation. Let the bell settle.
Phase 5. The Rack Position and Fixation
The rack position is the defining finish of the kettlebell clean. Following hand insertion, the bell settles against the forearm and upper body, creating a stable, supported position without excessive muscular effort or forearm impact.
Establishing the Rack Position
As the kettlebell completes its ascent, allow the elbow to settle comfortably towards the ribs, keeping the upper arm connected to the torso.
The bell rests against the outside of the forearm, with contact points varying according to anatomy, kettlebell dimensions and arm position.
Keep the forearm relatively upright when preparing for an overhead press, although a slightly angled position may suit other exercises.
Avoid excessive elbow flaring, shoulder shrugging or forcing the arm tightly against the ribs.
Wrist Alignment and Body Position
Maintain a secure rack grip, keeping the wrist approximately aligned with the forearm rather than bent sharply backwards.
The bell should rest securely against the arm and upper body without requiring constant biceps effort to prevent it falling forwards.
Stand tall with hips and knees extended, feet planted and ribs stacked over the pelvis.
Brace the trunk to control the asymmetrical load without excessive sideways leaning, lumbar extension or shoulder tension.
Some postural adjustment is natural. Prioritise comfortable, balanced positioning rather than enforcing identical alignment for every athlete.
Rack Fixation: Owning the Position
Once the kettlebell settles, briefly establish control before beginning the descent. This controlled finish is known as fixation.
A stable rack should demonstrate:
- Secure bell placement: Supported against the forearm and upper body without bouncing or impact.
- Controlled wrist: Approximately aligned with the forearm.
- Comfortable elbow: Close to the torso without forced positioning.
- Stable trunk: Balanced without excessive leaning or spinal extension.
- Controlled tension: Sufficient grip, shoulder and trunk stability without unnecessary stiffness.
A prolonged pause is unnecessary during continuous cleans, but briefly stabilising the bell while learning reinforces correct positioning.
Rack Variations
Rack positioning varies according to the exercise and lifting style.
For a clean and press, a relatively upright forearm supports the subsequent press. During a front squat, the upper arm may move closer towards the body’s midline to accommodate the load.
Kettlebell sport athletes often adopt a more supported resting position, sometimes resting the elbows against the torso or pelvis to conserve energy during prolonged sets.
These are legitimate technical adaptations. For the single-arm Hardstyle clean, prioritise a secure, comfortable rack that maintains balance and permits a controlled descent.
Coaching cue: Elbow down. Wrist aligned. Stand tall. Own the rack.
Phase 6. The Controlled Descent from the Rack
The descent requires a smooth transition from the rack into the backswing, coordinating bell trajectory, grip adjustment and upper-body control without excessive strain on the wrist, elbow or shoulder.
Initiating the Drop
Begin from a stable rack, standing tall with the trunk braced.
Guide the elbow down and slightly backwards, allowing the kettlebell to leave its supported position and descend close to the body.
Allow gravity to initiate the descent while maintaining shoulder and arm control. Avoid throwing the bell forwards, abruptly straightening the elbow or attempting to lower it slowly through biceps effort.
Repositioning the Grip
As the bell leaves the rack, the handle transitions from its supporting position across the palm towards the returning backswing grip.
For the finger-supported technique taught here, ease unnecessary grip tension and allow the handle to move towards the fingers, maintaining continuous contact and control.
Re-establish a secure grip before the returning load places substantial tension through the arm. Avoid excessive friction against the palm and calluses or allowing the handle to slip.
Some Hardstyle lifters maintain a deeper grip during portions of the descent, particularly with heavier loads. Either approach requires a secure transition without excessive wrist strain.
Guiding the Downward Trajectory
As the kettlebell descends, allow the working arm to lengthen naturally, using the lats and upper back to control its movement.
Maintain a compact trajectory without pulling the bell rigidly against the torso or allowing it to swing excessively forwards.
Avoid snapping the elbow straight or abruptly arresting the kettlebell’s momentum through the arm alone.
Keep the trunk relatively upright during the initial descent. As the returning arm approaches the torso, begin moving the hips backwards to receive the load.
The precise timing of this transition is covered in Phase 7.
Coaching cue: Guide the drop. Regrip securely. Keep the bell close.
Phase 7. The Return and Reload
As the descending kettlebell approaches the torso, time the hip hinge to receive the returning load, absorbing its momentum through the hips rather than allowing it to pull the shoulders forwards.
The timing resembles the delayed hinge used in the conventional kettlebell swing.
Receiving the Returning Kettlebell
As the working arm descends, allow the elbow to extend naturally while maintaining a secure grip and controlled shoulder position.
Begin hinging as the returning arm approaches the torso, pushing the hips backwards while allowing the knees to bend naturally.
Avoid hinging prematurely to chase the bell or waiting until it has travelled between the thighs and begun pulling you forwards.
The precise timing varies with kettlebell weight and descent speed, but the transition should remain smooth and controlled.
Establishing the Backswing
Guide the kettlebell between the thighs, maintaining a stable trunk, balanced foot pressure and controlled shoulder position.
Allow the working arm to lengthen naturally, keeping the bell close enough to load the hips effectively.
Avoid swinging excessively low, reaching towards the floor or exaggerating the depth of the hinge.
The hips absorb and redirect the returning load, while the arm guides its trajectory without independently arresting its momentum.
Reloading for Continuous Cleans
Once the backswing is loaded, explosively extend the hips to initiate the next repetition.
The movement should flow continuously between the backswing and rack, maintaining consistent acceleration, hand insertion and descent control.
Begin with short sets on one arm before parking the kettlebell and switching sides. Gradually increase repetitions as coordination improves.
Avoid allowing fatigue to shorten the hinge, encourage excessive arm pulling or disrupt the returning trajectory.
Consistency matters more than speed. Every repetition should follow a controlled path and finish in a stable rack.
Coaching cue: Wait for the bell. Hinge back. Absorb and drive.
๐ซ Breathing and Bracing
In Hardstyle kettlebell training, breathing is coordinated with explosive hip extension and trunk bracing to support force production and stability.
Inhale during the returning backswing, establishing sufficient abdominal pressure for the next repetition. Coordinate a short, forceful exhalation with the hip drive, reinforcing muscular tension during explosive extension.
Maintain appropriate trunk control in the rack, taking an additional controlled breath when needed. Resume rhythmic breathing as the kettlebell descends and the next repetition begins.
Avoid prolonged breath-holding during continuous cleans. Heavier loads may require stronger bracing, but stability should not depend on holding your breath throughout the set.
Kettlebell sport uses different breathing strategies, often incorporating additional breathing opportunities and more economical muscular tension during prolonged sets. This workshop follows Hardstyle principles, prioritising coordinated breathing, effective bracing and consistent control.
Coaching cue: Inhale on the reload. Exhale through the drive. Stay braced in the rack.
๐ Finishing the Set: Parking the Kettlebell
A controlled clean should finish as deliberately as it begins.
To park the kettlebell safely:
- Establish your final rack position, maintaining balance and trunk stability.
- Guide the bell out of the rack, allowing the handle to reposition securely within the hand.
- Receive the descending load through a hip hinge as the working arm approaches the torso.
- Guide the kettlebell forwards towards its starting position, allowing it to settle securely on the floor before releasing the handle.
The parking movement resembles the finish of a one-handed swing. Instead of initiating another explosive drive, the athlete redirects the kettlebell towards the floor under control.
Avoid dropping the weight directly from the rack, abruptly resisting its descent with the arm or reaching forwards prematurely.
If fatigue prevents you from parking the kettlebell safely, reduce the load or repetitions in subsequent sets.
Coaching cue: Control the drop. Hinge back. Park deliberately.
โ ๏ธ Common Faults & Rapid Corrections
The kettlebell clean demands precise coordination between hip drive, elbow guidance, hand insertion and rack control. Most technical faults arise from poor timing, excessive acceleration, inefficient bell trajectory or an unstable grip.
Identify the problem, apply the correction and revisit the corresponding drill before increasing load or repetitions.
๐ฃ Click on links below for more.
โ The Kettlebell Slams Into the Forearm
The problem: The bell rotates aggressively over the hand and strikes the forearm. Common causes include a wide trajectory, excessive acceleration, late hand insertion or an overly tight grip.
The correction: Keep the upward trajectory compact and generate only enough momentum to reach the rack. Ease unnecessary grip tension and guide the fingers through the handle while the bell is still rising, allowing it to settle against the forearm.
Coaching cue: Spear the fingers. Let the bell settle, not slam.
Corrective drill: Tall Muscle Clean / Hand-Insertion Drill, followed by controlled Floor-Reset Cleans.
โ The Kettlebell Swings Too Far Forwards
The problem: The bell follows an excessively wide arc, forcing the athlete to pull it back towards the rack and increasing the likelihood of forearm impact.
The correction: As the hips generate momentum, allow the elbow to bend and travel backwards towards the ribs, redirecting the kettlebell upwards. Keep the movement compact without aggressively pulling the bell against the chest.
Coaching cue: Tame the arc. Guide the bell close.
Corrective drill: Low Swing and Single-Arm High Pull.
โ Curling the Kettlebell Into the Rack
The problem: The athlete relies on elbow flexion to lift the weight rather than generating sufficient momentum through hip extension.
The correction: Establish the explosive hip drive before bending the elbow to guide the kettlebell towards the rack. Avoid initiating the movement with the biceps or shrugging the shoulder.
Coaching cue: Hips first. Elbow guides. Don’t curl.
Corrective drill: One-Handed Kettlebell Swing, followed by the Low Swing and Single-Arm High Pull.
โ Overpowering the Clean
The problem: Excessive acceleration sends the kettlebell higher than necessary, causing it to crash into the rack or requiring additional effort to control the catch.
The correction: Match the hip drive to the clean’s shorter trajectory. Generate enough momentum to reach the rack smoothly without throwing the kettlebell excessively high or attempting to arrest its movement through a forceful arm contraction.
Coaching cue: Enough power to rack. No more than necessary.
Corrective drill: Low Swing and Tall Muscle Clean / Hand-Insertion Drill, followed by light Floor-Reset Cleans.
โ Poor Hand Insertion and Excessive Grip Tension
The problem: An unnecessarily tight grip restricts handle movement, causing awkward rotation, forearm impact or excessive wrist extension.
The correction: Maintain a secure grip during acceleration, then ease unnecessary tension as the bell approaches the rack. Guide the fingers through the handle, allowing it to settle diagonally across the palm without losing control.
Coaching cue: Grip securely. Ease for insertion. Re-establish control.
Corrective drill: Tall Muscle Clean / Hand-Insertion Drill and Assisted Clean & Rack Hold.
โ An Unstable or Uncomfortable Rack
The problem: The kettlebell rests awkwardly against the forearm, the wrist bends excessively backwards, or the elbow flares away from the torso.
The correction: Practise establishing the rack with a manageable weight. Maintain a secure handle position, approximately aligned wrist and comfortable elbow placement, allowing the bell to rest against the forearm and upper body.
Avoid forcing an uncomfortable position to imitate another athlete’s technique.
Coaching cue: Wrist aligned. Elbow comfortable. Own the rack.
Corrective drill: Assisted Clean & Rack Hold.
โ Leaning Backwards or Sideways
The problem: The athlete compensates for the load through excessive lumbar extension, rib flaring or pronounced sideways leaning.
The correction: Finish standing tall with balanced foot pressure and the ribs approximately stacked over the pelvis. Maintain sufficient trunk tension to control the asymmetrical load without forcing an unnaturally rigid posture.
If significant compensation persists, reduce the weight.
Coaching cue: Stand tall. Brace the trunk. Keep the rack stable.
Corrective drill: Assisted Clean & Rack Hold, followed by short sets of Floor-Reset Cleans.
โ Losing Control During the Descent
The problem: The kettlebell leaves the rack along an uncontrolled trajectory, swings excessively far forwards or places abrupt tension on the elbow and shoulder.
The correction: Guide the bell out of the rack without throwing it forwards. Allow the handle to reposition securely and the working arm to lengthen naturally, directing the descending weight towards the backswing.
Avoid lowering the entire load through the biceps or allowing the elbow to snap straight.
Coaching cue: Guide the drop. Let the arm lengthen. Receive with the hips.
Corrective drill: Controlled Rack Descent, progressing from assisted lowering to an independent rack-to-backswing return.
โ Hinging Too Early or Too Late
The problem: Poor timing disrupts the return. Hinging too early encourages unnecessary reaching, while hinging too late allows the descending kettlebell to pull the shoulders forwards.
The correction: Maintain trunk control during the initial drop. Begin pushing the hips backwards as the returning arm approaches the torso, allowing the hips to receive the load through a coordinated backswing.
Coaching cue: Wait for the bell. Hinge back. Absorb the load.
Corrective drill: Controlled Rack Descent and One-Handed Kettlebell Swing.
โ Allowing Fatigue to Disrupt Technique
The problem: Accumulating fatigue causes excessive arm pulling, inconsistent acceleration, poor hand insertion or an uncontrolled descent.
The correction: Reduce repetitions, load or training density when movement quality deteriorates. Use sufficient recovery to maintain consistent technique, particularly during conditioning sessions.
If you cannot establish a secure rack or safely return the kettlebell to the floor, end the set.
Coaching cue: Finish while you still control the bell.
Corrective drill: Floor-Reset Clean for technical resets, progressing to short sets of Continuous Single-Arm Cleans.
๐ Quick Troubleshooting Guide
| Common Fault | Likely Cause | Quick Correction |
|---|---|---|
| Bell slams into forearm | Wide trajectory, late insertion or excessive acceleration. | Keep the bell close, insert the hand earlier and allow a smooth rack catch. |
| Bell swings too far forwards | Insufficient elbow guidance; excessively wide arc. | Guide the elbow backwards towards the ribs to redirect the bell upwards. |
| Curling into the rack | Arm pulling replaces hip-generated momentum. | Drive through the hips first; use the elbow to guide rather than lift. |
| Overpowering the clean | Excessive acceleration for the shorter clean trajectory. | Moderate the hip drive; generate only enough momentum to reach the rack. |
| Poor hand insertion | Excessive grip tension or restricted handle movement. | Ease grip tension during insertion and guide the handle diagonally across the palm. |
| Unstable or uncomfortable rack | Poor handle placement, wrist alignment or elbow positioning. | Align the wrist, settle the elbow comfortably and support the bell against the forearm. |
| Leaning backwards or sideways | Inadequate trunk control or excessive loading. | Brace the trunk, maintain balanced foot pressure and reduce the load if necessary. |
| Uncontrolled descent | Bell cast forwards, poor regrip or abrupt arm extension. | Guide the drop, re-establish a secure grip and allow the arm to lengthen naturally. |
| Hinging too early or late | Poor coordination between returning bell and hip movement. | Wait until the arm approaches the torso, then hinge backwards to receive the load. |
| Technique deteriorates with fatigue | Excessive repetitions, loading or insufficient recovery. | Reduce volume or load; end the set when movement quality deteriorates. |
๐ฏ The Principle
Correct the specific fault rather than changing the entire movement at once. Return to the relevant drill, establish consistent control and increase the difficulty only when the problem has been resolved.
Persistent, sharp or worsening discomfort should not automatically be attributed to poor technique. Stop the exercise and seek appropriate assessment when necessary.
๐ Kettlebell Clean Variations & Progressions
Once you’ve mastered the single-arm Hardstyle clean, variations can introduce new challenges involving force production, coordination, grip control and loading.
Some change the starting position or movement mechanics; others increase resistance or combine the clean with additional exercises.
Choose variations that support your training goals rather than adding complexity unnecessarily.
๐๏ธ The Dead Clean
Difficulty: Intermediate
Primary focus: Force production from a stationary position.
The dead clean begins with the kettlebell resting on the floor and brings it directly into the rack without a preliminary hike pass.
Unlike the standard swing clean, the athlete cannot rely on momentum from a preceding backswing. The hips and legs generate the initial acceleration, while the working arm guides the kettlebell along a compact upward path.
This variation develops starting strength and exposes weaknesses in initial positioning, acceleration and hand-insertion timing.
Prerequisites: Reliable hip-hinge mechanics, hand insertion and rack control.
Suggested practice: 3 sets of 3โ5 repetitions per arm, resetting completely between repetitions.
Important distinction: Our Floor-Reset Clean in Section 4 uses a hike pass before each repetition. The Dead Clean begins directly from the floor. Coaching terminology varies, but these are the definitions used throughout this workshop.
โก The Hang Clean
Difficulty: Beginner to Intermediate
Primary focus: Short-range acceleration and rack-entry coordination.
The hang clean begins with the kettlebell suspended in the working hand rather than resting on the floor.
From a controlled standing hang, the athlete performs a short hip-loading movement before accelerating the kettlebell into the rack.
This reduces the available movement range and challenges the athlete to coordinate the hip drive, elbow guidance and hand insertion without a full backswing.
It is particularly useful for refining timing and learning to generate appropriate acceleration from a shorter movement.
Prerequisites: Comfortable rack positioning, reliable hand insertion and secure grip control.
Suggested practice: 2โ3 sets of 3โ5 repetitions per arm.
Technical priority: Generate sufficient acceleration without excessive arm pulling.
Some coaching systems use the term hang clean more broadly. Here, it refers specifically to the shorter-range movement described above.
๐ The Continuous Swing Clean
Difficulty: Intermediate
Primary focus: Repeated hip power, rhythm and conditioning.
The continuous swing clean links successive repetitions without returning the kettlebell to the floor.
From the rack, the athlete guides the bell into a controlled backswing before immediately generating the next hip drive.
Although the fundamental mechanics remain unchanged, consecutive repetitions demand consistent timing, grip management and rack control.
This is the standard continuous movement developed in Section 4 and used throughout our programming examples.
Prerequisites: Reliable Floor-Reset Cleans and a controlled rack-to-backswing return.
Suggested practice: 3โ5 sets of 5โ8 repetitions per arm, adjusting volume and recovery to maintain technique.
Technical priority: Consistent acceleration, smooth insertion and controlled descent throughout the set.
๐ช The Double-Kettlebell Clean
Difficulty: Advanced
Primary focus: Bilateral loading, power and trunk stability.
The double-kettlebell clean brings two kettlebells simultaneously from the backswing into a secure double-rack position.
Both arms must coordinate their movements while the trunk stabilises the greater combined load. The athlete may require a slightly wider stance to provide adequate clearance between the legs.
During the upward transition, both elbows guide the kettlebells towards the torso as the hands insert smoothly into their respective handles.
The bells should settle into a stable double rack without uncontrolled collisions, excessive wrist extension or compensatory leaning.
Double cleans develop the ability to handle heavier combined loads and establish the foundation for double-kettlebell presses, squats, jerks and complexes.
Prerequisites: Competent single-arm cleans on both sides, reliable double-kettlebell swing mechanics and a stable double rack.
Suggested practice: 3 sets of 3โ5 repetitions using two manageable kettlebells.
Technical priority: Maintain coordinated acceleration and control of both kettlebells during the ascent and descent.
๐ก๏ธ When Should You Introduce Variations?
Before progressing, establish reliable control of the standard clean, including its acceleration, hand insertion, rack and returning descent.
A hang clean may be introduced relatively early, while heavy cleans, double-kettlebell cleans and bottoms-up cleans demand greater strength, coordination or grip control.
There is no requirement to master every variation. Select those that contribute to your objectives and increase difficulty only when your technique can support it.
๐ Final Takeaway
Power Under Control
The kettlebell clean combines explosive hip power with precise coordination. The hips generate the acceleration, the arm guides the trajectory, and smooth hand insertion brings the bell securely into the rack.
But a successful clean requires more than reaching that position. Controlling the descent and receiving the returning load are equally important.
Develop the fundamentals, refine your technique and progress only when you can repeat the movement consistently.
Generate the power. Control the trajectory. Own the rack. Master the return.
The clean forms a vital bridge between the foundational swing and more advanced kettlebell movements, including the clean and press, double-kettlebell exercises and clean and jerk.
For further technical development, revisit our Kettlebell Swing Workshop to reinforce the hip-drive mechanics, or explore the Kettlebell Snatch Workshop to progress towards explosive overhead lifting.
If you have enjoyed this post please share or feel free to comment below ๐
๐ Our Other Posts


๐ฃ๏ธ The Cry of the Banshee Workout
In Irish folklore, the Banshee’s mournful cry foretold approaching death. Tonight, her terrible lament becomes