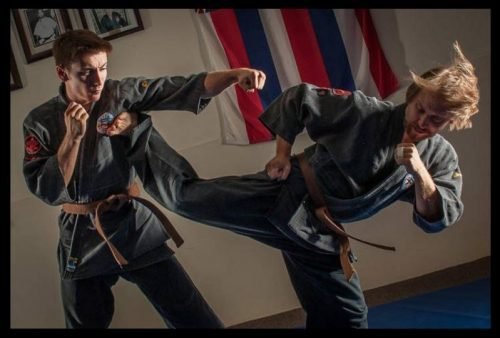
If you can’t do a pull-up yet, don’t stress — most people start there. This guide gives you a simple progression that builds real pulling strength step by step, taking you from floor-based rows to your first strict pull-up with confidence.
Table of Contents
Introduction
If you can’t do a pull-up yet, you’re not alone. Strict pull-ups demand genuine relative strength, solid scapular control, and a strong grip. The good news? All of that can be built with a clear progression and consistent work. This guide walks you through a structured set of pull-up progressions, from basic rows on the ground to your first strict pull-up.
Why Use Progressions?
A full bodyweight pull-up asks a lot from the lats, upper back, arms and grip at the same time. Progressions let you:
Reduce the load while keeping the pattern.
Build strength in the exact range and positions you’ll need later.
Groove correct technique from day one, instead of learning bad habits.
Day one isn’t about reps — it’s about showing up and grabbing the bar.
The Road to the Pull Up
The following are 10 progression exercises (leading up to a full unassisted pull-up) that will help you build up the required strength with practice:
Resistance Back rows.
Inverted Body Rows.
Dead hangs.
Negative Pull-ups
Flexed Arm hangs.
Body rows.
Leg assisted Pull-ups.
Band assisted Pull-ups.
Chin-ups.
The Main Event: The Pull-up
Think of each step here as a checkpoint. Own it before you move up.
1. Dumbbell or Barbell Rows
🎯 Aims
Build basic pulling strength.
Dumbbell back rows, a good place to start as you build up you upper body strength.
🏋️♂️ Technique
Hinge at the hips with a flat back.
Row the weight towards your lower ribs.
Pause briefly, then lower under control.
📝 Notes
Use whatever you have: dumbbells, barbell, kettlebell, sandbag, loaded rucksack. Focus on clean reps and a strong squeeze between the shoulder blades.
2. Inverted Body Rows
🎯 Aims
Your body is now the load.
Inverted rows are an ideal early progression — any low, sturdy bar gives you a controlled way to build real pulling strength.
🏋️♂️ Technique
Set a bar in a rack or use low parallel bars.
Lie underneath with the bar roughly over your mid-chest.
Grip the bar, arms straight, heels on the floor.
Pull your chest up to the bar, keeping your body in a straight line.
Lower under control.
📝 Notes
To make it easier, bend the knees and bring the feet closer. To make it harder, straighten the legs and elevate the feet.
3. Dead Hangs – Grip and Shoulder Position
🎯 Aims
Get comfortable hanging from the bar.
Dead hangs build the grip and shoulder control you’ll need later — stay tight and hold for as long as you can with clean position.
🏋️♂️ Technique
Grip the bar with hands just outside shoulder-width.
Let the body hang with arms fully extended.
Gently draw the shoulders down away from the ears (no shrugging).
Breathe and stay tight.
📝 Notes
Aim to build up to 20–30 seconds with a solid shoulder position. This builds grip strength and introduces the joint angles you’ll need.
4. Flexed Arm Hangs – Owning the Top Position
🎯 Aims
Own the hardest part of the pull-up.
Hold the top position with the shoulders set and chest to the bar — this builds the control you’ll need to finish every strict rep.
🏋️♂️ Technique
Use a box or jump to get your chin above the bar.
Hold that top position, elbows bent, chest close to the bar.
Keep the shoulders pulled down and back.
Don’t let the head poke forwards.
📝 Notes
Work towards 10–20 second holds with clean form.
5. Negative Pull-Ups – Eccentric Strength
🎯 Aims
You only train the lowering phase.
Take your time on the way down — eccentric work accelerates strength gains and closes the gap to your first full pull-up.
🏋️♂️ Technique
Start at the top (chin over bar) using a box or small jump.
Brace your core and slowly lower yourself to a full hang.
Aim for a 3–5 second descent to start, building up to 8–10 seconds.
📝 Notes
Start with low volume: for example 3–5 sets of 3–5 negatives. When 10-second negatives feel strong, you’re very close to your first full rep.
6. Foot-Assisted Pull-Ups – Reducing the Load
🎯 Aims
Use the legs only as light support — the upper body should drive the pull while you reduce assistance over time.
🎯 Aims
Think “training wheels” for the movement.
🏋️♂️ Technique
Set a bar low enough that you can keep your feet on the floor (or use a barbell in a rack).
Grip the bar as for a pull-up.
Use your upper body as the main driver and let the legs lightly assist.
Avoid launching with the legs – they’re there to help you finish the rep, not to do the rep for you.
📝 Notes
Progress from two feet on the floor to single-leg assistance, then reduce leg drive as you get stronger.
7. Jumping Pull-Ups – Pattern + Eccentrics
🎯 Aims
Groove the full movement and overload the eccentric.
Use the jump to provide momentum on the ascending part of the pull up. Build strength on the eccentric lowering part of the pull up.
🏋️♂️ Technique
Stand under the bar.
Lightly jump and pull at the same time so your chin clears the bar.
Focus on a slow, controlled descent back to full hang.
The jump is there to help you reach the top, not to cover up weak pulling.
📝 Notes
If the bar is too high, use a box. Again, the emphasis is on control on the way down.
8. Band-Assisted Pull-Ups – Adjustable Assistance
🎯 Aims
Bands allow you to keep the full pull-up pattern but reduce the effective load.
Resistance bands, a cheap and effective way to improve your pull up ability. Go for lighter bands as your strength increases.
🏋️♂️ Technique
Loop a resistance band over the bar and secure it.
Place a knee or foot in the band.
Perform pull-ups as normal: full hang to chin over bar.
Use a band that makes sets of 5–10 reps challenging but doable.
📝 Notes
As you get stronger, move to a lighter band or switch back to foot-assisted variations.
9. Chin-Ups – Stronger Arms, Easier Leverage
🎯 Aims
Palms facing you, more help from the biceps.
Chin-ups add more biceps leverage, making them a valuable bridge to full pronated-grip pull-ups.
🏋️♂️ Technique
Take a supinated (underhand) grip, hands about shoulder-width apart.
Hang with arms straight, shoulders set.
Pull until your chin clears the bar, then lower under control.
Muscles used:
Biceps.
Latissimus Dorsi.
Biceps brachii, brachialis, brachioradialis.
Teres major.
Posterior deltoid muscles.
Deep spinal stabilisers (transverse abdominis, lumbar multifidus and thoracolumbar fascia).
Some of the muscle groups utilised whilst undertaking a chin up.
📝 Notes
Chin-ups are often easier than pull-ups because of the mechanical advantage and extra contribution from the biceps. They’re an excellent bridge between band-assisted work and full pronated-grip pull-ups.
As coach Charles Poliquin put it, chin-ups are the “squat of bodyweight exercises” for the upper body.
10. The Main Event – The Strict Pull-Up
A full hang, a clean pull, and a controlled return — the pull-up shows what your training has earned.
🎯 Aims
This is what everything has been building towards.
💪 Muscles Used
🏋️♂️ Technique
Grip the bar with a pronated (overhand) grip, hands just outside shoulder-width.
Start from a full dead hang with shoulders engaged (pulled slightly down and back).
Brace your core and pull your elbows down towards your ribs.
Aim to bring your upper chest towards the bar, not just your chin.
Pause briefly at the top.
Lower yourself under control to a full hang.
Repeat for clean reps – no swinging, no half-reps.
📝 Notes
Full range of motion: Arms straight at the bottom, chest high at the top.
No chicken-necking: Move your body, not just your head.
Quality first: 5 perfect reps beat 15 ugly ones.
Putting It Together – Sample Progression Flow
You don’t have to use every variation at once. A simple path might look like:
Phase 1: Rows → Inverted Rows → Dead Hangs.
Phase 2: Flexed Arm Hangs → Negatives → Foot-Assisted Pull-Ups.
Phase 3: Band-Assisted Pull-Ups → Chin-Ups.
Phase 4: Strict Pull-Ups (with occasional negatives or bands as needed).
Cycle back when needed. The goal is consistent, technically clean pulling volume over time.
🏁 Final Note
Pull-ups demand patience, technique, and consistency — and that’s exactly what makes them a powerful milestone. Each step in this progression builds control over your own body, reinforces healthy shoulder mechanics, and grows real pulling strength. You’re not chasing a party trick — you’re developing capability that carries over to every sport, every lift, and every physical challenge you take on.
Move through the checkpoints with intent. Own each rep. Earn each step forward. Your first strict pull-up won’t be a surprise — it will be inevitable.
If you have enjoyed this post please share or feel free to comment below 🙂